
Không có sản phẩm nào được chọn


![Trọn bộ 4 camera IP Hikvision 2MP giá rẻ [H2023-4IP]](/assets/shops/2015_05/tron-bo-4-camera-ip-hikvision-2mp-gia-re-h2023-4ip-11.jpg)
![Trọn bộ 7 camera IP Hikvision 2MP giá rẻ [H2023-7IP]](/assets/shops/2015_05/tron-bo-7-camera-ip-hikvision-2mp-gia-re-h2023-7ip-11.jpg)
![Trọn bộ 8 camera IP Hikvision 2MP giá rẻ [H2023-8IP]](/assets/shops/2015_05/tron-bo-8-camera-ip-hikvision-2mp-gia-re-h2023-8ip-11.jpg)


Cài đặt Home Assistant lên Synology NAS
01 Tháng 06
Home Assistant là một phần mềm mã nguồn mở cho nhà thông minh, giúp người dùng có thể điều khiển từ một nơi duy nhất,...
Trong suốt thời gian xây dựng và phát triển công ty luôn cố gắng để tự hoàn thiện bản thân, đào tạo ra những đội ngũ cán bộ, nhân viên dày dặn kinh nghiệm trong thiết kế cũng như thi công. Giám sát quản lý chất lượng các công trình chuyên ngành SX, Công nghiệp, dân dụng và các công trình khác như hệ thống điện, công nghệ thông tin và truyền thông.
Đầu tư, đổi mới thiết bị công nghệ, không ngừng đào tạo con người, kịp thời nắm bắt thông tin khoa học kỹ thuật và vận dụng linh hoạt trong sản xuất cũng như trong kinh doanh.


Home Assistant là một phần mềm mã nguồn mở cho nhà thông minh, giúp người dùng có thể điều khiển từ một nơi duy nhất,...
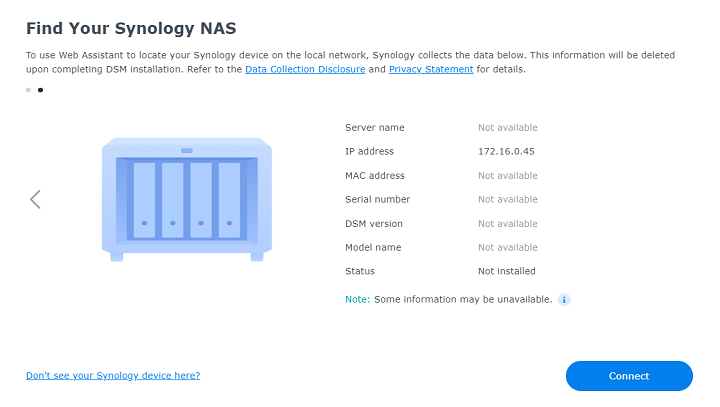
NAS Synology là thiết bị lưu trữ mạnh mẽ được sử dụng rất nhiều trên thế giới. Thiết bị NAS Synology giúp người dùng cá...
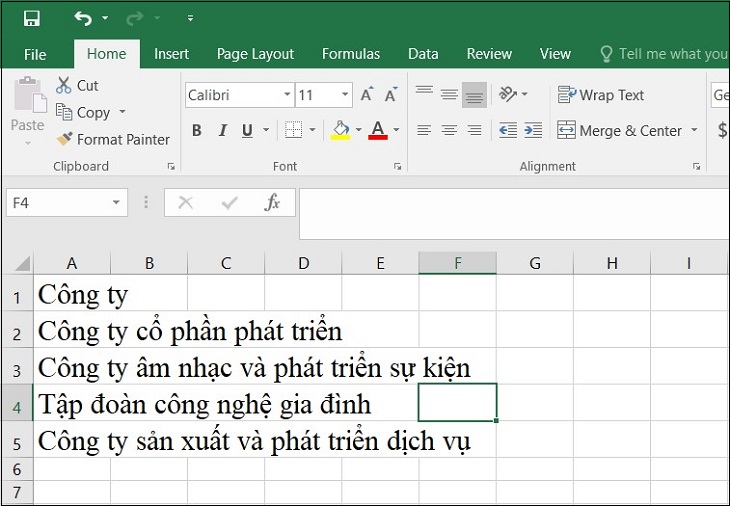
Khi sử dụng Excel, bạn sẽ thường xuyên gặp tình trạng nội dung quá dài nhưng không biết phải điều chỉnh độ rộng ô như...


Ghi nhận những thành quả cũng như nhưng đóng góp tích cực mà Thép Việt Đức đã đạt được trong những năm qua. Nhà nước, Cộng đồng các doanh nghiệp và xã hội đã dành cho Thép Việt Đức nhiều phần thưởng xứng đáng như: Huân chương Lao động Hạng Nhì; Huân chương lao động hạng Ba; Cờ thi đua Chính Phủ; Bằng khen của Thủ tướng Chính Phủ; Bằng khen của Bộ Tài Chính; Bằng khen của Bộ trưởng Bộ Khoa học Công nghệ; Bằng khen của UBND tỉnh Vĩnh Phúc; Giải vàng chất lượng Quốc Gia; Giải thưởng Thương hiệu mạnh Việt nam; Cúp Top 10 Danh hiệu 100 thương hiệu việt bền vững; Cúp Vàng ISO…..Và nhiều giải thưởng cao quý khác.


